The Bridal Notebook
Thursday, August 3, 2017
Monday, September 15, 2014
Lace and $ Store Candles ... Who Knew :DYI Project
Add lace to boring $ store candles to make them look amazing in whatever color you like.
Thursday, September 11, 2014
Tuesday, September 9, 2014
Balloon Arch Tutorial via The House that Lars Built

http://www.thehousethatlarsbuilt.com/


Ok, ok I hear you! You want the tutorial! I had every intention of getting the tutorial from the BHLDN Flamingo Pop shoot and Midsummer Mingle to you so much sooner than this, but I've been on GO ever since. But now, calm your fears, here it is. In all it's flamingo balloon goodness. I'm still perfecting the process (perfecting balloons?) but yes, turns out there is a learning curve to it as far as engineering goes.
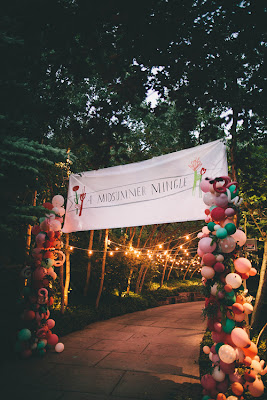
The key to the success of creating a similar balloon arch is variety of balloon colors and variety of balloon sizes, which you can create with how much you blow it up. I tend to like color schemes that focus on three main colors. For the Bhldn shoot it was pink, mint, and white. I then supplemented it with shades of those colors. I added in some balloons that are clear, some with polka dots for a bit more whimsy. For A Midsummer Mingle I worked with Partyland here in Utah (though they ship!) and they exposed me to the EZ Twist balloon maker which allowed me to add in twisted balloons into the arch. I LOVE the effect they created and I think it would be rad for so many applications.

Materials: balloons in a variety of colors and sizes (I used Partyland and they have a great selection. The brand I used was Qualatex), EZ twist balloon maker (if you want to add in the curly long balloons), balloon pumps (they will save your life! I used these ones), glue dots (I used these ones), clear shipping tape (I used this brand), lo-temp glue gun (like this one), chicken wire (depending on where you're positioning it), fishing line, gaffer tape (from a photographers shop), huge trash bags from Home Depot
The structure
Figure out what space you're trying to fill. For the BHLDN shoot I knew I wanted to attach the arch to the wall so I used chicken wire to create the more organic shape and attached it to the wall and ceiling with tons of gaffers tape (so it didn't ruin the paint) and fishing line that I attached to the ducts above. The pictures shown below are from the Midsummer shoot. I didn't do a full arch, but two poles that took the place of an arch because we had a huge banner above. If I wanted to do a true arch, I would consider buying this one for your event.
The balloons will weigh down the chicken wire so make sure that the fishing line is taut.
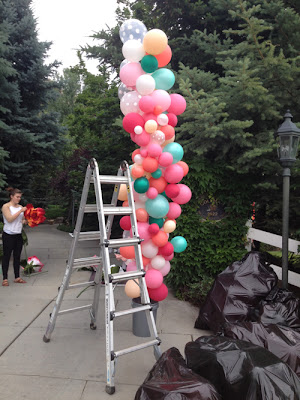
For Midsummer Mingle we created two poles to attach the balloons to. We got two buckets from Home Depot and added cement into them to create a sturdy base (see pics below).


The night before we had a major balloon blowing up session. I got enough pumps so we could get lots of help. I had never used a pump prior to this project but I tell you, I will never go back to blowing it up with my own lungs. Not worth it! We put all the balloons into the huge trash bags for storage and transportation. I wanted balloons in a variety of sizes so we did some as small as 3" up to the full size.
Step 1: Start by applying on the largest balloons before you add on the smaller balloons. I mixed up the colors throughout the structure so they weren't clumped into the same space. We attached the balloons with clear shipping tape. Gaffer's tape worked well too. Just tape the end of the balloon. Do not be sparse with the amount of tape you use. I would even suggest taping it around the pole or chicken wire.
Step 2: Continue filling in the arch with your biggest balloons. It will not look great yet but keep on going! Make sure you're filling in all the holes and mixing the colors thoroughly.
Step 3: Once you've taped the big balloons onto your structure, now you'll begin by adhering balloons to balloons. We originally taped balloons to balloons with shipping tape but we found that they started to drop off due to heat. What I would suggest is to use glue dots instead. They are much more secure and work well on balloons. For extra security, you can even use a lo-temperature glue gun. However, in the heat, it will melt so Glue Dots are your best bet. Top off the balloons with more balloons and more balloons.
Step 3: If you're adding in twisty balloons, do those last.
Step 4: If you're adding in florals you simply need to tuck them in. There should be enough security with the chicken wire and balloons for them to not move. But, if they do need extra security, tie the flowers in with fishing line.


(for the BHLDN shoot) photography by Natalie Norton
(for the Midsummer shoot)
step photos by my iphone
creative direction and styling by Brittany Jepsen
balloons provided by Partyland for Midsummer
balloons provided by Zurchers for BHLDN
flowers by Ashley Beyer of Tinge for BHLDN
flower by Lizy Bowden of Lizy's Lilies for Midsummer
lots of help from spectacular volunteers especially Carli Randolph and Teya Wiltise
Wednesday, July 30, 2014
Wednesday, July 2, 2014
Subscribe to:
Comments (Atom)
